In this article, we will cover the basics of working with International Geodesign Collaboration (IGC) projects in Geodesignhub. To know more about IGC, please review their website and join the IGC community first.
Prerequisites
Geodesignhub provides multiple tools to help you run your IGC project as smoothly as possible, before you begin we recommend that you:
- Familiarize yourself with the IGC, its objectives, goals and the project structure
- Register your research group and your study area and select climate actions on ArcGIS / Geoplanner
- If you are new Geodesignhub, your IGC administrator will provide you access to our introductory course and we recommend that at the very least the project administrators complete this course to understand the basics of Geodesignhub.
Process
The image below depicts at a high level the series of steps required for you to undertake a IGC project in Geodesignhub.
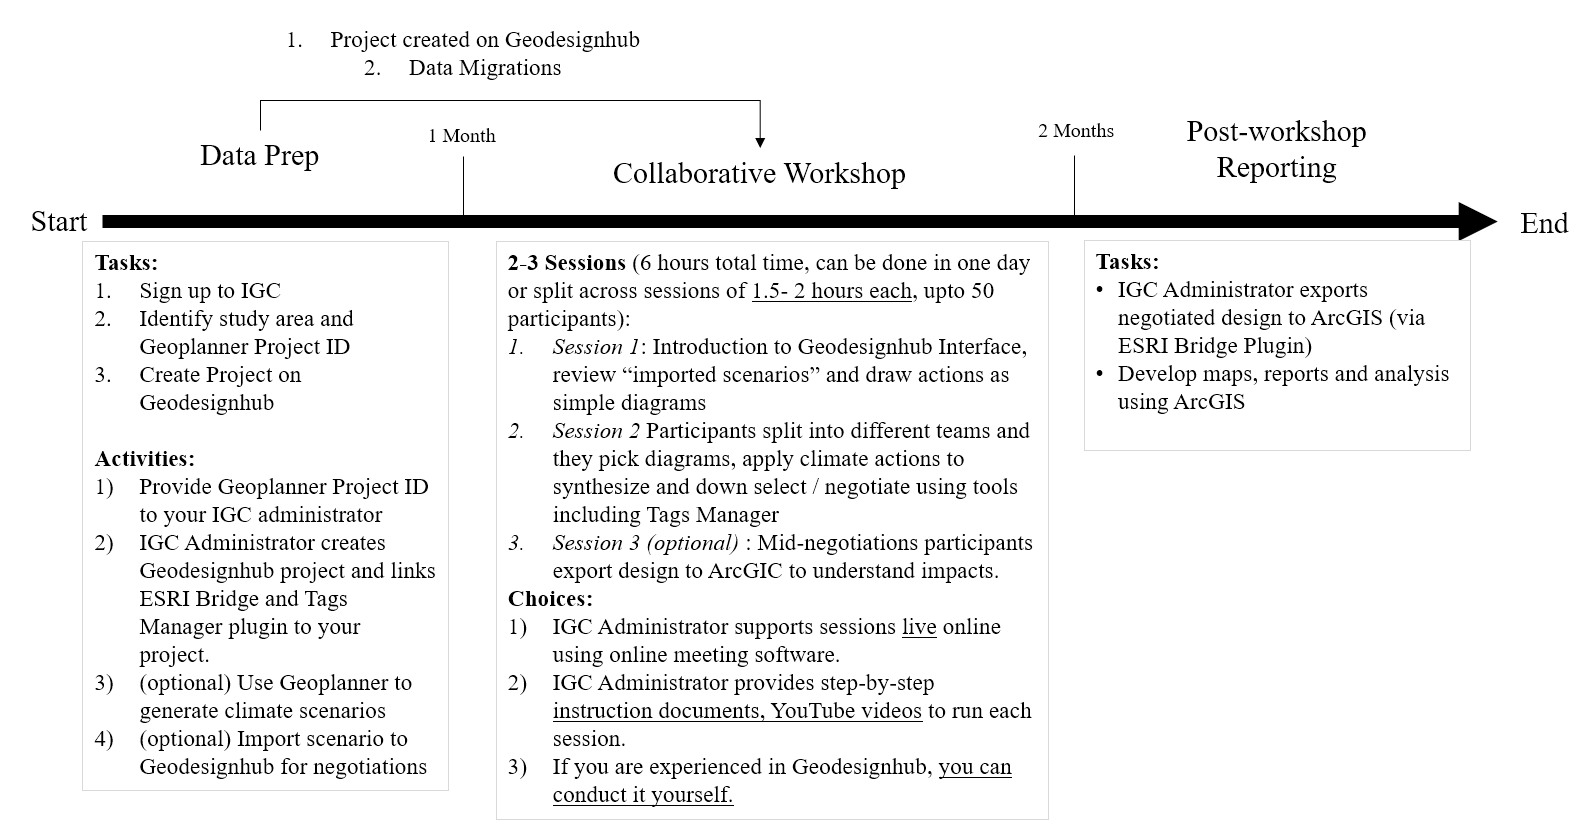
Time required
It is recommended that you allocate about a month from start to finish: to complete the prerequisites, create the project, conduct negotiations and export the data to ArcGIS. All of these can be done much faster or slower but we recommend about a month part-time spent on this.
Support
IGC will provide you with project support and you can use this Geodesignhub community page to raise any issues or questions that you may have. In addition, for Geodesignhub specific queries, you can use our office hours booking tool.
To facilitate your work, your IGC administrator will setup your project and link the ESRI Bridge and Climate Actions manager plugin for your project.
Running a IGC Project in Geodesignhub
The IGC specifies a number of things like systems, interventions, climate actions etc. as a part of the project. When a IGC project is created on Geodesignhub, the platform will setup all of these for your so you don’t have to manually configure your project. Following are some notes to get you started with conducting a IGC project on Geodesignhub.
Understand
An IGC project can be developed and presented independent of and without using Geodesignhub. One of the reasons why you may decide to use Geodesignhub is that you have an interest in using Geodesignhub negotiations and conduct a collaborative design activity.
Geodesignhub has the ability to exchange data with ArcGIS so once you setup the project, the set of climate actions that you have selected in ArcGIS Online will appear in Geodesignhub. Therefore, you must setup a ArcGIS project and go through the IGC registration and setup process on ArcGIS first before you start a project in Geodesignhub.
In Geodesignhub, climate actions are called “Tags”, you can use the Tags tooling for a diagram to assign or remove Climate Actions.
Starting your project
Your IGC administrator will create a new project for you, before you reach out to your administrator with a request to create a IGC project for you, you will need a ArcGIS Project ID that will be linked to your Geodesignhub project.
Your administrator will create a Geodesignhub project for you with the appropriate systems and the climate actions that you have selected for your study.
You can choose to apply climate actions in Geoplanner first, in that case you can migrate those to Geodesignhub to conduct negotiations over them.
Conduct Negotiations, apply actions
You will use Geodesignhub to conduct negotiations and develop negotiated design in Geodesginhub.
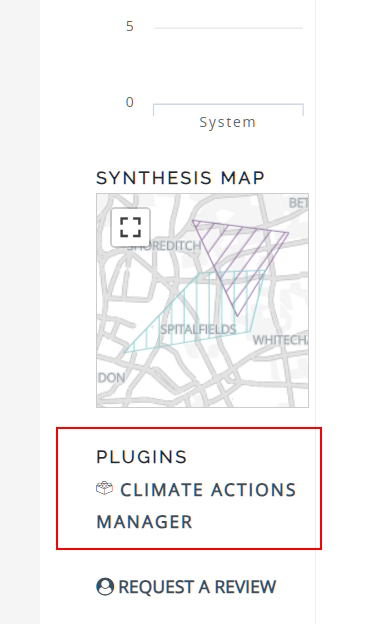
Your administrator will also setup the Climate Actions Manager plugin to help you with applying multiple climate actions for diagrams.
For experts: In negotiations, you can export a design to ArcGIS and use ArcGIS / Geoplanners analytical functionality to understand the impacts.
Export design to ArcGIS
Once you are satisfied that the negotiations are complete and the appropriate climate actions are applied, you must export your final negotiated design to ArcGIS. All IGC reporting and analytics will happen on ArcGIS so you must export your design to be included in the reporting.
Contribute / Technical Details
Data migrations between ArcGIS / Geoplanner and Geodesignhub are enabled by the ESRI-Bridge plugin and the Climate Actions management is done by the Climate Actions Manager plugin. If you have an interest in developing these, please contribute via Github as pull-requests (PRs).
Frequently Asked Questions
Q: I used Geoplanner first, how do I import data from Geoplanner?
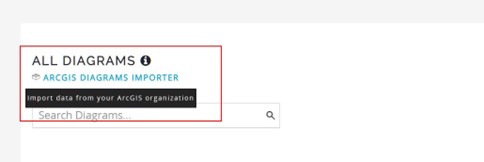
A: If you used Geoplanner to build scenarios and want to import the data into Geodesignhub, you can use the ArcGIS importer plugin:
- You have to sign in into ESRI first via the link at the top of your project (image shown below)
- Once you have signed in, underneath the “All Diagrams” section you will see the Import pugin. We limit the ability to import data into Geodesignhub, so only project administrators can see this plugin, if you cannot see this plugin you are not the project administrator.

Q: How do I export my design back to Geoplanner?
A: Once you have concluded the Geodesign negotiations, you can export your final negotiated design as a ArcGIS scenario for processing and
- In the “Design Comparisons” section, select your team and design and then “Export to ArcGIS” plugin, you will be asked a confirmation. If you do not see the plugin, you must sign in via ESRI first.

Q: How do I change Climate Actions in Geodesignhub?
A: In Geodesignhub, Climate Actions are called as Tags. There are two ways to add / remove / change tags in Geodesignhub:
- You can change tags / climate actions on individual diagarms via the Tags tool in Geodesignnhub, you can click on it after opening the diagrams
- Via the method above, you can only change tags for one diagram, in case you want to change multiple tags for multiple diagrams, you can use the “Climate Actions Manager” plugin

Q: I do not see Climate Actions / Tags in my project?
A: Your Climate Actions / Tags are setup in your project automatically, you can reach out to your project administrator in case you do not see the appropriate tags in your Geodesginhub project.
Q: The import / export plugins are not visible on my page
A: You can try clearing your browser cache and closing / re-logging in to Geodesignhub. This can impact if you have accessed Geodesignhub earlier.